Quarried stone can be expensive and difficult to acquire, but it is possible to create a more affordable and readily available substitute with epoxy
Even if you manage to find the kind of stone you’re looking for, the exact shade and quality of veining you get are definitely not within your control.

"Have you got one with a little more blue?"Photo by Henry & Co. on Unsplash.
Once you’ve managed to curate exactly the right kind of stone you’re looking for, and in the quantity you need, you would then have to employ professional tools to carve it up in the right dimensions and apply high-level engineering to install it.

Use one of these to fasten a slab of marble at your own peril. Photo by Steve Johnson on Unsplash.
It probably goes without saying that stone is extremely tough and heavy – your typical handheld electric drill will not put a hole in it.
Using just the tools and materials you can find in a neighbourhood hardware store, you could instead create a substitute to marble with epoxy.
Applied on wood or concrete in layers, you could have your very own customised panels and countertops that look like marble but are far more affordable.
As you can cut or form these to the exact size you need, wood or concrete panels coated in epoxy will also have fewer gaps for water to seep through – and you wouldn’t have to worry about as many grout lines remaining water-resistant as you would with tiles.
1. Identify the panels you want to create.
2. Take the proper measurements and check them twice.
3. Cut the wood or form the concrete panels to the exact dimensions you need.
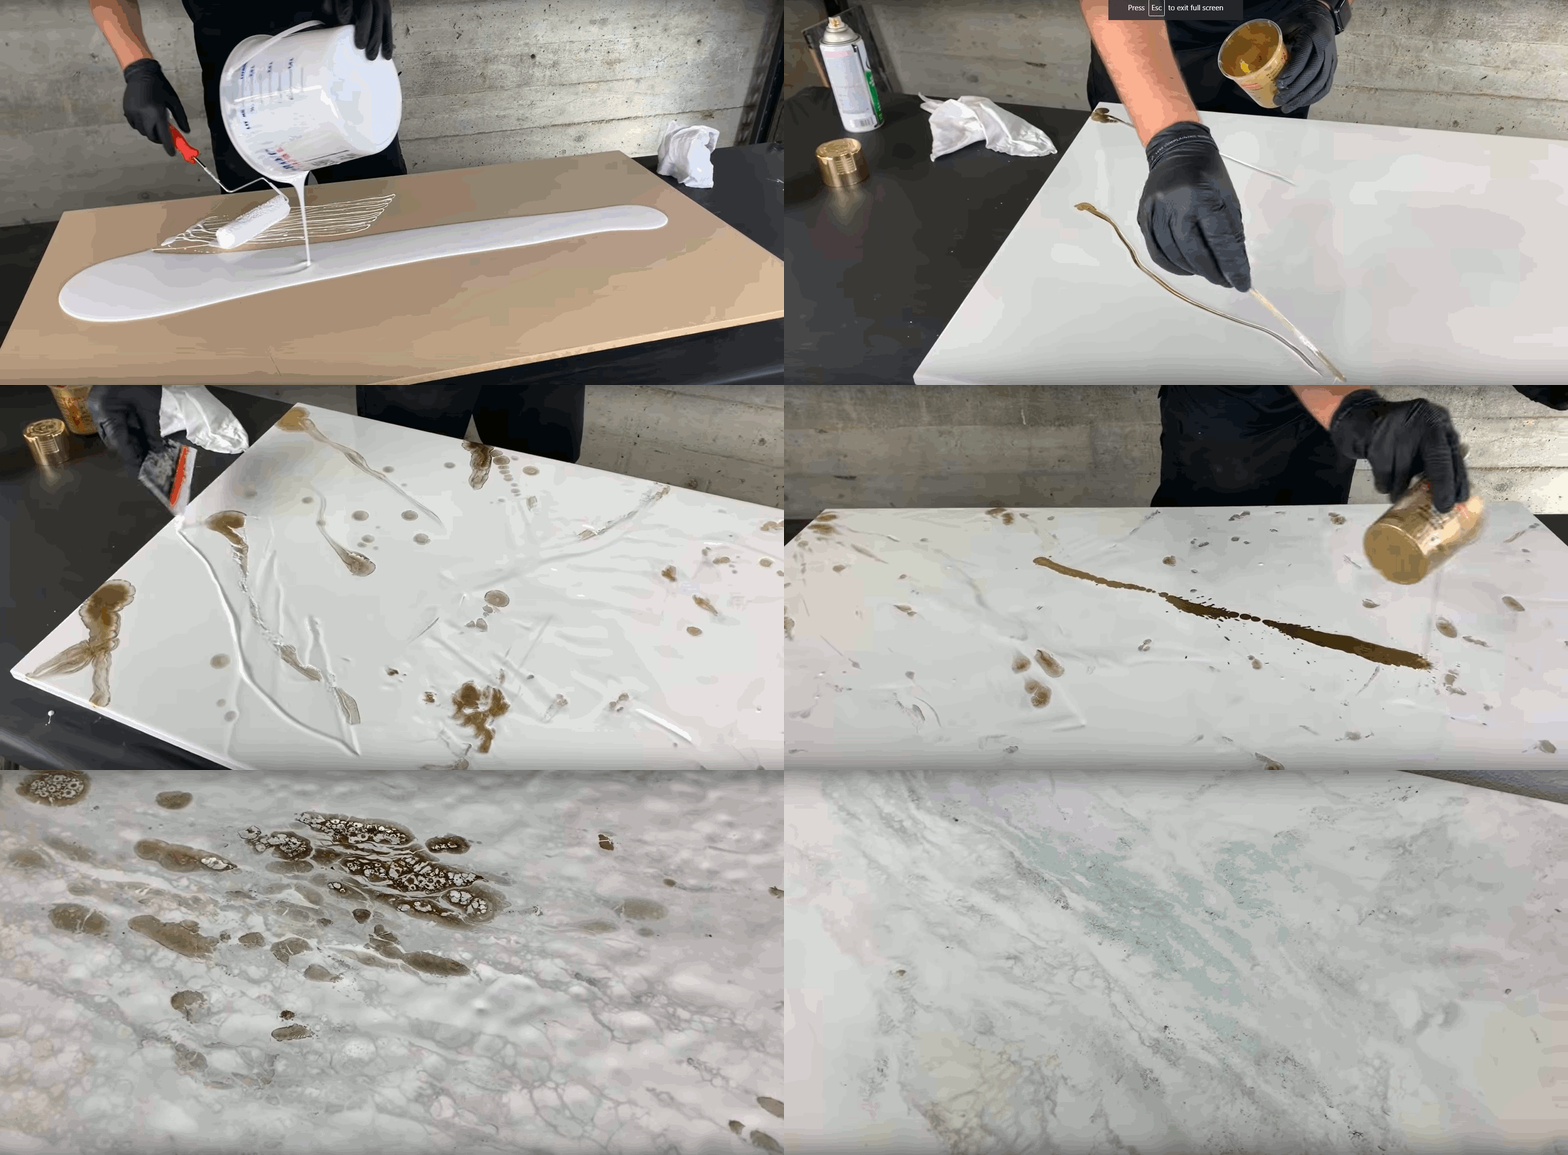
4. Mix the two parts of clear epoxy together and apply a thin primer coat with a roller.
5. Once the primer coat is dry to the touch, mix another batch of coloured epoxy, or clear epoxy combined with an acrylic or alcohol-based dye, or even powdered inorganic pigments of your choice. Use titanium dioxide, if you’re looking to mimic a white marble such as Carrara, or carbon, if you’re looking to create something like a Marquina marble.
6. Coat the entire panel with the base coat of epoxy using a roller.
7. Once the base coat is dry to the touch; or if you want the colours to mix, begin this next step while the base coat is still wet and apply the next layer of epoxy mixed with another pigment of your choice.
8. Paint, drip, or spray your desired patterns over the base coat. Go wild.
9. Spray 91% Isopropyl alcohol to thin out portions where you want the base coat to show more vividly.
10. Before your pattern coat dries, lightly go over your work with a blow torch to pop any bubbles.
11. Once the pattern coat has dried, lightly sand the panel with increasingly fine grades of grit from 100 to 150, and finally, to 220.
12. Mix a batch of clear epoxy hardener to seal the finished product and let it dry.
Marvel at your new epoxy-marbled shelf or decorative panel, and then, perhaps hang it up in the bathroom?
Disclaimer
This article is intended to convey general information only. It does not constitute advice for your specific needs. This article cannot disclose all of the risks and other factors necessary to evaluate a particular situation.
Any interested party should study each situation carefully. You should seek and obtain independent professional advice for your specific needs and situation.
Stay ahead of the crowd and enjoy fresh insights on real estate, property development, and lifestyle trends when you subscribe to our newsletter and follow us on social media.

